Homemade Saint Maure Cheese


Sainte-Maure de touraine 04.jpg


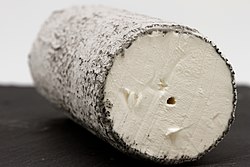
Making Saint Maure is trying something really fun, getting moldy. Once you try this moldy Chevre, you may never go back to plain Chevre again. You will need molds like in plastic containers with holes in the bottom, to make this cheese.


Ingredients:


  • 1/2 gallon of fresh goat milk or raw, unpasteurized goat milk
  • 1 oz. mesophilic culture
  • liquid rennet
  • 1/8 tsp. of white mold powder (Penicillium Candidum).

Special supplies:

  • 5 Chevre molds
  • draining mats

*Remember to sterilize all your equipment before you begin.


Directions:


  • In a stainless steel pot, warm the milk to 72°.
  • Add the culture, white mold powder and stir well. Now you need to add 1/5 of a drop of rennet. Or measure out 5 Tablespoons of water into a small cup. Add to the water 1 drop of liquid rennet and stir well. Now measure out 1 Tablespoon of the rennet dilution (this one Tablespoon contains 1/5 of a drop of rennet) and add it to the milk. Stir well.
  • Cover the milk and place the pot somewhere that it can sit undisturbed and will stay about 72° for about 18 hours. But, you can let it go for 24 hours. What you do is place the pot in the cold oven until the next day.
  • When the milk has coagulated, you are ready to mold the cheese.


To make moldy cheeses:


Pour off any whey that has separated from the curd. Place your molds on a rack over a large baking pan. A lot of whey will drain from your cheese, and you will need a large pan to catch it. Carefully ladle the curds into the molds. Let the curds drain for two days at room temperature.


After the cheese has drained you can carefully unmold them into your hand. Sprinkle all the sides of the cheese with a little Kosher salt. When you unmold the cheeses, they may already have started to develop their fuzz.


For this aging, you will need some draining mats. For smaller weave in the mat, you can use a plastic craft “canvas” and it is available at Wal-Mart. If you want a larger hole in your drying rack, use “egg crate”. It comes in a large sheet intended for use in suspended ceilings and is available at home improvement stores. You can use these two “mats” separately and in combination to dry and age cheeses.


To age your Chevre, place them on a drying mat cut smaller than a large gallon size ziplock freezer bag. Slip the mat with the cheeses into a gallon ziplock bag, blow up the bag and seal it. Now you have a little aging “cave”. Let the cheeses age on the counter for a few more days and then move them into your cheese aging fridge. Here they continue to fuzz up for a few weeks. You can eat your little fuzzies at any time, but try to let them age a couple weeks to develop a good covering of mold.


Additional Cheese Recipes, click the link to view the details.


Related topic for you;


Image result for Mexican Queso Fresco

Queso Fresco


Meyenberg Goat Milk Products Valley Goat Cheddar – Aged, 8-Ounce Packages (Pack of 5)

Homemade Queso Fresco – For Beginners

Image result for Mexican Queso Fresco


What does Queso Fresco means ?


Queso Fresco means Fresh Cheese and is semi-soft cheese. I prefer cheese with lots of flavor, and this Queso Fresco has many variations. Queso Fresco is of Latin American origin. It is lightly pressed and ready to eat in just a few days.


Correct temperatures are very important in cheese making, so ensure to use a good thermometer. The easiest way to control the temperature of the curds is to use a homemade double boiler. Place the cheese making pot into the canning kettle and place on the stove. Fill the canner with water up to the level of the milk in the cheese making pot. Then place a thermometer in the water of the canner as well as the milk. This way you can tell the temperature of the water, which in turn, helps you control the temperature of the milk and curds.


Ingredients:


  • 2 gallons of unpasteurized goat milk

  • 4 oz. mesophilic culture

  • 1/4 tsp. calf lipase powder (mild “piccante”)

  • 1/2 tsp. Liquid rennet dissolved in 1/4 Cup water

  • 2 Tablespoons kosher salt .


Directions:


  • Bring the milk to 86° and add the mesophilic culture and lipase. Stir well and let set, to ripen, for 1 hour. Add the rennet and stir briskly for 15 seconds. Cover the pot and let the milk set for 45 minutes, or until you get a clean break. Hold the milk at a temperature of 86° for the entire time.
  • Cut the curds into 1/4″ pieces with a stainless steel knife. This always seem to be the trickiest part of cheese making, but take your time, and don’t worry if all the curds are not cut to exactly 1/4″. After you have cut the curds, do not stir them yet. Let them rest, undisturbed for 10 minutes
  • Now, you can stir the curds and cut any that you had missed. If you stir the curds with a big wire whisk, this will cut any curds you missed automatically. Raise the temperature of the curds to 95° over the next 20 minutes, stirring occasionally so the curds do not stick together. Let the curds settle for 5 minutes, undisturbed.
  • Drain the whey from the curds. You can conserve drained whey and use for whey based cheese making like Ricotta. Now, leave the curds in their cheese making pot that is placed inside the canner. Make sure the water in the canner is kept at 95° and this will allow you to hold the curds at a temperature of 95°. Hold the curds at 95° for 10 minutes, stirring with your hand occasionally so that the curds don’t stick together.
  • After you have held the curds for at 95° for 10 minutes, stir in the salt. At this point in the cheese making you could spice up your cheese by adding some herbs, such as chives, or even minced jalapena peppers, if you’d like.
  • Line a cheese mold with cheesecloth and add the curds. Press the cheese at 10 pounds for 10 minutes, remove it from the press, flip it over and place it back in the press. Continue pressing at 20 pounds for 1 hours and then raise the weight to 35 pounds for 6 hours.
  • After it has pressed for six hours, remove the cheese from the mold and let it air dry on a rack overnight. The next day, put it in a ziploc bag or wrap it and refrigerate the cheese for several days before testing. Honestly, it is worth the wait. If you taste the cheese too soon, it may seem “rubbery”. Additionally, the flavor will develops during the short “aging” process.


The Queso Fresco cheese will keep for several weeks in the refrigerator. My previous experience proved that this cheese does not freeze well.


Additional Cheeses Recipes,  Click the link to view the details.


Related topic for you;