
Mar
10
2023
Sunday Baked Pork and Potatoes – Popular Gourmet Recipe
By charlimblog
and has no comments yet.
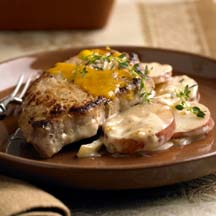
Main dish at it’s best. Baked chops top sliced potatoes for this substantial dish.
This recipe requires total 2 hours 20 minutes time, and Serves 6.
Ingredients:
- 1/2 cup goats milk
- 2 cups cheddar cheese (shredded)
- 6 New York (top loin) pork chops (3/4-inch thick)
- 2 Tbsp. vegetable oil
- 6 medium potatoes (sliced)
- 1 onions (large, halved and thinly sliced)
- salt (to taste)
- black pepper (to taste)
- 75 oz. cream of mushroom soup
- 8 oz. sour cream (carton)
Directions:
- Pre-heat oven to 325 degrees F. Cook chops, half at a time, in hot oil in large skillet until lightly brown, turning once. Spray 9×13-inch baking dish with non-stick spray. Arrange sliced potatoes and onion evenly in baking dish. Sprinkle with salt and pepper.
- Stir together cream of mushroom soup, sour cream and milk in medium bowl. Stir in 1 cup of the Cheddar cheese. Spoon soup mixture evenly over potatoes and onion in baking dish. Arrange chops on top.
- Cover chops and potatoes with foil. Place baking dish on baking sheet. Bake about 2 hours or until potatoes are tender and chops have internal temperature on a thermometer reads 150 degrees F. Uncover. Sprinkle with remaining 1 cup Cheddar cheese. Bake about 10 minutes more or until cheese melts and internal temperature on a thermometer reads 160 degrees F. Let stand for 10 minutes before serving.
- SHORTCUT SUNDAY PORK & POTATOES: Brown chops as above. Meanwhile, cook sliced potatoes and onion in heavy large covered pot in enough boiling water to cover for 5 minutes. Drain well. Continue as above, except cover and bake until internal temperature of chops is 160 degrees F., about 1 hour. Uncover. Sprinkle with remaining 1 cup Cheddar cheese. Bake about 10 minutes more or until cheese melts. Let stand for 10 minutes before serving.
Serving Suggestions
A shortcut is also given at the end of the recipe (above) for those weeknights you need a hearty dinner. Serve with green beans, apple salad and a tall glass of milk.
Each serving provides 758 kcal; protein 47g, carbohydrates 39g, fat 46g, cholesterol 156mg, fibre 3g, and salt 888mg.

