Japanese Milk Bread – Popular and Easy Bread Recipe


Hokkaido milk bread

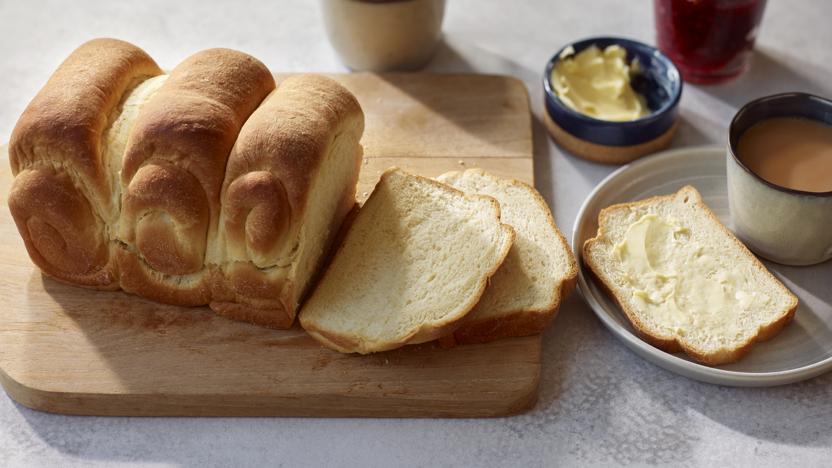
A simple starter mix helps to give this Hokkaido – Japanese milk bread its light and fluffy texture. Serve it with butter and jam for breakfast or afternoon tea.

This recipe requires over 2 hours Preparation time and 30 minutes to 1hour Cooking time, Serves 1 loaf.


Ingredients:

For the starter

For the dough

  • 1 tbsp dried milk powder or sweetened condensed milk
  • 120ml/4fl goat milk, at room temperature
  • 55g/2oz unsalted butter, softened
  • 325g/11½oz strong white flour, plus extra for dusting
  • 55g/2oz granulated sugar
  • 2¼ tsp (7g sachet) fast-action dried yeast
  • 1 tsp salt
  • 1 free-range egg, at room temperature, beaten
  • vegetable oil, for greasing
  • double cream or melted butter, for brushing

Directions:

  • To make the starter, put the flour, milk and 4 tablespoons water in a small saucepan over a medium heat and stir continuously for 4–5 minutes, or until the starter thickens to the consistency of mashed potatoes. Transfer to a bowl, cover and leave until the starter is at room temperature.
  • To make the dough, put the flour, sugar, yeast, milk powder (or condensed milk) and salt into the bowl of a stand mixer and whisk together. Add the milk, starter and beaten egg. Using the dough hook attachment, beat on a low speed for 5 minutes. Add the butter and beat for 5 more minutes. Turn the speed up to medium and beat for a final 5 minutes.
  • Transfer the dough to a lightly oiled bowl, cover and leave for 1 hour or until doubled in size.
  • Brush a 900g/2lb loaf tin with oil. Turn the dough out onto a lightly floured surface and divide into four equal pieces. Roll each piece out to a rectangle and then fold in each of the long sides. Starting at one of the shorter edges, roll up and then place in the oiled loaf tin, seam-side down. Repeat with the remaining pieces of dough. Cover and leave to rise for 45 minutes.
  • Preheat the oven to 200C/180C Fan/Gas 6. Once the dough has risen, brush the top of the loaf with cream or melted butter and bake for 35–40 minutes or until the top is golden brown. Carefully lift the bread from the tin and tap the bottom to check it sounds hollow.
  • Remove from the oven and leave for 5 minutes before removing from the tin. Leave to cool on a wire rack.


Pumpkin Bread with Sage and Brown Butter – Popular and Easy Bread Recipe

Pumpkin Bread | Tangled Up In Food


You can make your next loaf of pumpkin bread stand out from all the rest with a French pastry technique. Browned butter, or beurre noisette, is a simple sauce that provides a nutty edge to baking, which strike a perfect sweet-and-savory balance.


This Pumpkin Bread with Brown Butter and Sage recipe keeps all the lush texture you expect from pumpkin bread while infusing delightful caramel notes. And the sage amplifies the earthy warmth. It’s everything you love about this seasonal treat, turned up times 10.


This recipe requires 20 minutes Preparation time and 60 minutes Cooking time, 24 Servings


Ingredients:


  • 3 1/2 cups all-purpose flour
  • 1/2 teaspoon allspice
  • 1 teaspoon baking powder
  • 2 teaspoons baking soda
  • 1 teaspoon cinnamon
  • 1/2 teaspoon ground cloves
  • 4 large eggs
  • 2 cups granulated sugar
  • 1 teaspoon ground nutmeg
  • 1 teaspoon kosher salt
  • 1 cup light brown sugar
  • 1/2 cup whole goats milk
  • 16 ounces pumpkin puree
  • 2 sprigs sage
  • 1 cup unsalted butter


Directions:

  • Preheat the oven to 350 degrees.
  • Add the butter to a pan on medium heat. Work low and slow to let the butter melt, come to a slight fizz, and then brown slightly. This will take about 4-5 minutes. When you see the milk solids separate and start to brown at the bottom of the pan, turn off the heat and add the sage. The sage will sizzle for a few minutes. Let it infuse into the butter and then remove the sage leaves. Transfer the browned butter to a bowl.
  • Add a splash of the milk to the brown butter to temper it, reserve the rest of the milk for later.
  • In a large bowl, add the sugar, brown sugar, eggs and pumpkin. Add in the cooled brown butter and mix well.
  • Combine the dry ingredients and add to the wet, alternating with splashes of the milk to help combine.
  • Pour the batter into two parchment-lined 8-by-5-inch loaf pans.
  • Bake for 60-70 minutes or until a toothpick comes out clean.
  • Let them cool, then slice and serve!

*Notes – Breads can be stored, wrapped, at room temperature overnight or refrigerated for up to 5 days.

How to make Fresh Dill Bread – Popular and Simple Gourmet Recipe

Image result for dill bread from whey


Now that you have made your Ricotta, you will still have a lot of left over whey. You can now use it in bread baking, soup stock or even to cook pasta. Ricotta freezes fairly well, but is never quite as good as fresh. You can freeze lots of Ricotta in the summer to use in bread baking in the winter.


The following Dill bread recipe uses both whey and ricotta in its preparation. However, if you do not have whey and Ricotta, the bread can be made with water instead of whey, and small curd cottage cheese instead of Ricotta. This is a delicious bread that makes excellent toast and grilled cheese sandwiches. The recipe makes two loaves of Dill bread.


 Ingredients:


  • 1/2 Cup. Whey
  • 1 Tablespoon. Yeast
  • 2 Cup. Ricotta
  • 2 Tablespoon. Butter
  • 4 Tablespoon. Sugar
  • 1 small. Onion, minced
  • 2 tsp. Dill weed
  • 2 tsp. Dill seed
  • 2 1/2 tsp. Salt
  • 1/2 tsp. Baking soda
  • 2 Eggs
  • 1/2 Cup. Wheat germ
  • 5-6 Cup. Flour


Directions:


  • Heat the whey to luke warm and place in a large mixing bowl. Dissolve the yeast in the whey. Place the Ricotta and the butter in a microwave safe bowl and heat in the microwave until the butter just melts – about 1 1/2 to 2 minutes on high; be sure to stir it occasionally.
  • To the yeast mixture add the sugar, onion, dill weed & seed, salt, baking soda and eggs. Mix until combined. Add the wheat germ and the Ricotta, and mix well. Add 1 1/2 cups of the flour and beat on medium for 5 minutes. Slowly add another 1 1/2 cups of flour. Now switch to the dough hook and continue to slowly add enough of the remaining flour to create a fairly stiff dough. I use a heavy duty Kitchen Aid mixer when making this bread. If you have a “weaker” mixer, you may have to finish adding the rest of the flour by hand. Turn the dough out onto a floured board and knead until the dough springs back when you poke it – approximately  5 to 10 minutes.
  • Place the dough in a greased bowl, cover and let rise until doubled, about 1 1/2 hours. Punch down, knead briefly and divide in half. Shape the dough into smooth loaves and place in greased loaf pans. Cover and let rise until doubled, about an hour. Alternatively, if you do not want to time the risings, you can just keep an eye on the loaves until they look right.
  • Bake in a preheated oven at 350° for about 50 minutes.
  • When the bread is done, turn it out of its pan and let it cool on a wire rack. Cut yourself off a piece and eat it while it is still warm. Yummy!


More Best Gourmet Recipes  for you.


Cheese and Hot-Smoked Trout flakes