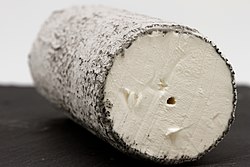
Homemade Smoked Provolone Cheese


What is Provolone ?


Pronounced: proh-voh-LOH-nee

If you can imagine mozzarella with a fuller flavor, then you have imagined Provolone. It is a semi-hard Italian cheese, aged for a minimum of six months, and originated in Casilli near Vesuvius  where it is still produced in various shapes as in 10 to 15 cm long pear, sausage, or cone shapes. A variant of Provolone is also produced in Japan and North America.


Smoked cheese makes a wonderful addition to sandwiches. Now, you can create this great taste with the step-by-step instructions for the best homemade smoked provolone cheese.


Ingredients:


  • 4 gallons of raw goats milk
  • 1 teaspoon of type K or KL lipase powder dissolved into 1/3 cup of cool, non-chlorine water
  • 4 teaspoons of citric acid powder dissolved in 3/4 cup of cool, non-chlorine water. Allow this to sit for 5 minutes or more.
  • 1 teaspoon of rennet mixed in 1/4 cup of cool, non-chlorine water


Instructions making the Provolone Cheese


  • Warm 2 gallons of the milk to 86 degrees F
  • Mix in the dissolved lipase powder.
  • Keeping temperature at 86 degrees F, let milk set for 1 hour to incubate.
  • Add the dissolved citric acid to the remaining 2 gallons of cold goats milk. Then, add the cold milk to the 2 gallons of warm milk and bring the temperature to 86 degrees F.
  • Add the dissolved rennet to the combined 4 gallons of milk.
  • Allow to sit for 15 minutes or more. Whey will cover the top of the curds.
  • Now you are ready to cut the curds into 1/2 inch cubes.
  • Allow curds to settle to the bottom of the pot, and then slowly raise the temperature to 115 degrees during a 30 mins time frame while stirring.
  • And now, using a large dipper or stainless pot with a handle, remove the whey from the curds that have settled to the bottom of the pot. Leave enough whey to cover the matted curds.
  • Prepare ice water in a pan long enough for the desired length of your provolone cheese log.
  • Meanwhile, heat the whey that is covering the provolone log that you have begun shaping. Use a cloth that you drained the curds into to turn the log of provolone in the heated whey. Remove the heated whey and the provolone cheese log from the heat. Continue to lift the cloth to aid in shaping the log of cheese.
  • When cheese becomes smooth and firm enough to handle, place the cheese into the ice water. Avoid handling the cheese log as much as possible.
  • Do not rush the cooling process! If you have a wooden mold 3″x3″ and 10″ long, place the cheese log into the mold. After the cheese log chills, remove and rub with iodine free salt and cover with plastic wrap. Place in refrigerator at 45 degrees and redress every two days for 8 or 10 days. If you are going to smoke the provolone cheese, do not uncover the cheese log.
  • After 10 days, wipe the cheese with cool water and pat dry.


Smoking the Provolone Cheese


  • Cold smoke your provolone cheese for approximately 4 hours. You can use small hickory chips, fresh from the woods or small sassafras twigs from sassafras trees.
  • Cold smoking cheese and meat is simple and inexpensive.
  • All you need is a clean metal bottomless garbage can and a soldering iron. Take an average size can of vegetables and partially cut the lid, leaving enough of the lid attached to close the can after filling it with wood chips. Be sure to remove the outside paper from the can, then wash and dry it.
  • Use tin snips to cut a round slot in part of the lid to allow you to put the soldering iron into the can filled with wood chips. Fill the can with small hickory chips or small sassafras twigs and place soldering iron into the can. Place garbage can on gravel and place the can with chips and soldering iron just under the metal bottomless garbage can. If you have a smoker, it will also work just fine.
  • And now, this is what makes it a cold smoker. Take a large box that will cover the top of your smoker and cut a hole in the bottom of the box, about a 6 inch diameter circle. Place the box on top of the smoker making sure that the box will receive all of the smoke. Place a rack a few inches above the bottom of the box and place this rack as far away from the 6 inch diameter hole as possible. This to allow the cheese to absorb the smoke and remain cool.
  • After about 15 minutes, unplug the soldering iron. Check the cheese, and if the cheese is dripping, then remove the cheese, place in a plastic bag and refrigerate.
  • Repeat the process until the cheese starts making a rind. The color of the cheese will have a slight yellow cast. Do not let the rind become too dried out and hard. Wax the cheese after it is smoked, so that other cheeses that are being aged do not become smoked. Age 6-8 months or more from date of being waxed.


Enjoy! The best Smoked Provolone Cheese.


More Hard Cheese Recipes , Check them out!


Velveeta


More related goat cheese recipes;


Fried goat cheese on platter

Fried Chevre                                         Baked Chevre Spread


Homemade FETA Cheese Recipes


Fresh feta cheese slices


Feta Cheese Recipe


What is Feta ?


Feta is a salty Greek cheese, usually made with either goat or sheep’s milk. Feta is neither soft nor hard cheese but in-between. It is wonderful crumbled on salads and crackers, and can also be used in cooking. Unlike most cheeses, it is ripened in brine. Feta develops quite a strong flavor and if you like “hardy” cheeses, you must give it a try.


Ingredients:


  • 2-3 gallons goat milk – ( use a little over 3 gallons for raw, unpasteurized goat milk)
  • 4 oz. mesophilic culture
  • 1/4 – 1/2 tsp. Kid or Kid/Lamb Lipase powder
  • 1 tsp. Liquid rennet dissolved in 1/2 Cup water
  • Kosher salt
  • Brine: 1/2 Cup Kosher salt per 1/2 gallon of water (boiled and cooled to below room temp.)


Directions:


  • In a double boiler pot set up, warm the goat milk to 86°. Add the culture and lipase. Lipase is the enzyme that gives Feta that great Feta flavor.
  • Stir well and let ripen, covered, for one hour.
  • Keeping the milk at 86°, Add the rennet and stir briskly for 15 seconds. Cover and let set about 30-40 minutes, or until you get a “clean break”.
  • You can check for a clean break by sticking your knife, or thermometer, into the curd at an angle. Pull straight up out of the curd; if the curd breaks cleanly around the knife and whey runs into the crack that is made; you have a “clean break.” Once you see this for the first time, you will know just what I mean.
  • Cut the curd into 1/2″ pieces.
  • Cutting the curds can be the most confusing part, but just don’t worry so much. Use a long knife held vertically and cut 1/2″ slices in the curds. Then turn the pot 90° and cut across in 1/2″ slices the other direction, making a kind of checkerboard pattern. Now hold the knife at a sideways 45° angle and retrace your cuts. Turn the pot 1/4 turn and retrace the cuts. Turn it again and cut and then one final turn and cut. By the last turn you probably won’t be able to see the original cuts, but just do the best you can. It is alright if think you did not cut the curd perfectly.
  • Do not stir yet. Let the curds rest for 10 minutes.
  • After this rest period, stir the curd gently and cut any pieces that you missed when you first cut the curd. Hold the curd at 86° for 45 minutes, carefully stirring occasionally to prevent the curd from sticking together. This process of “cooking” the curd helps the curd “toughen up” as well as release it’s whey.
  • Place a big colander over a big pot and line the colander with a large piece of dampened cheesecloth. If you dampen the cheesecloth, it will stick slightly to the colander, holding it in place.
  • Carefully pour the curd into the colander. Tie the corners of the cheesecloth together and hang the bag to drain.
  • After 3-4 hours, take the cheese down and turn the cheese over in the cheesecloth, from top turned to bottom. This turning will “even up” the cheese into a nice form. Otherwise, it will have a rough form cheese; it is edible, just not so attractive.
  • Let your cheese hang and continue draining for about 24 hours, at this point it will start to develop a distinctive odor. Inform your family of the odor if you need to.
  • After your cheese has hung for about 24 hours or so, remove it from the cloth and cut it into  slices or usable size cubes (about 2-3 inches). Sprinkle all the sides of the slices or cubes with kosher salt and place them in a sterilized, large, seal-able, container. Cover and let sit at room temperature for 2-3 days to “harden up” the blocks. The blocks will continue to release whey during this time; that is normal.
  • Transfer the blocks (and their whey if you wish) to a large sterilized glass container. Add the brine. Do not add the brine too soon, the cheese sometimes starts softening up. The cheese is still good; you may just want to use it in cooking instead of for crumbling.
  • Age for at least I month before use in order to develop flavor. Your Feta cheese will keep in its brine (refrigerated) for a very, very long time ( up to a year), and will only keep getting better (stronger). On occasion, you may find some mold forming on top of the brine. When this happens, just skim it off, the cheese is still fine. If a piece of the cheese was sticking above the brine, it may mold. Just remove it, the rest of the cheese is still good.


Always remember that it takes a lot of milk to make a little cheese. And how much cheese you get will also depend on other factors, like type of milk used, fat content of milk, stage of lactation of the goat that produced the milk, handling of curds, temperatures during cheese making and hang time, just to name a few.


More Goat Cheese Recipes, Check them out!


Related recipe for you;


Haloumi cheese slices

Halloumi


Learn How To Marinate FETA Cheese


You can use feta purchased from the store, or learn how to make feta cheese using unpasteurized goat milk, and follow the above Feta cheese recipe.

Feta cheese is an excellent choice for making marinated cheese.

Marinated feta cheese will keep at room temperature for a time, if it is prepared properly. It can also be stored in a container in the refrigerator.

To keep the cheese at room temperature, you will need to use glass canning jars.

To use canning jars, first sterilize the jar, lid and ring by boiling in water for ten minutes. Remove all parts from the water with tongs and allow to cool.

Place alternating layers of herbs and cubes of feta cheese into the jar. Leave about 1″ space at the top. Cover the cheese and herbs completely with vegetable oil.

Stronger herbs will produce a more noticeable flavor in the cheese, but choose according to your taste. You can use either dried or fresh herbs. Some herbs that are typically used include:


  • peppercorns
  • garlic
  • dill
  • rosemary
  • basil
  • thyme
  • bay leaves
  • fig leaves


Directions:


  • Olive oil will have the strongest flavor, and will add a beautiful golden-green color, but you can also use canola, soybean, or other vegetable oil if you prefer a lighter taste and look.
  • Place the lid and ring on the jar and tighten. The cheese will keep without refrigeration for a while, as long as it is completely covered by the oil.
  • Use your marinated feta as a snack.
  • Experiment with your own combinations to find your favorite taste. French Feta Cheese


More related Goat Cheese recipe;


Homemade MOZZARELLA Cheese


Mozzarella cheese curds made into ball


Making Mozzarella is not that time consuming but it does take three stages which  can be completed in one day or could stretch over a three day period. If you start it one day, you should make sure to allow time to finish it the next day. If you forget to finish the cheese the next day, you can do it the next day after that but do not stretch any more days.

The following are detailed instructions on how to make Mozzarella Cheese.

However, I do not recommend that you try this as your first cheese attempt. Perhaps, start with something a little easier like Panir and work your way up to making this cheese.


Ingredients:

  • 2 to 3 1/2 gallons fresh goat milk (not homogenized) or raw, unpasteurized goat milk.
  • 4 oz. Thermophillic culture (Lactobacillus helveticus)
  • 1 1/4 tsp. citric acid per gallon of milk – (I use 4 tsp.)
  • 1/4 tsp. calf lipase (mild “piccante”)
  • 1/2 tsp. Liquid Rennet diluted in 1/2 Cup. cool water
  • 1/2 C. Kosher salt

Directions:

  • Pour the milk into a double boiler pot set up and add the citric acid. Warm the milk to 91°. Add the culture and lipase.
  • Stir well and let ripen, covered, for one hour.
  • Keeping the milk at 90° – 91° . Add the rennet and stir briskly for 15 seconds.
  • Cover and let set about 15 minutes, until the curd has “Set” or until you get a “clean break”. It takes less time to set than other cheese due to the high acidity. You can check for a clean break by sticking your knife, or thermometer, into the curd at an angle. Pull straight up out of the curd; if the curd breaks cleanly around the knife and whey runs into the crack that is made; you have a “clean break.” Once you see this for the first time, you will know just what I mean  (*Note:  Sometimes Mozzarella will set but doesn’t “break” quite the same as other cheeses, due to it’s desire to hold together and stretch, but you can definitely tell it is “set”).
  • Cut the curds into 1/4″ – 1/2″ pieces.
  • Cutting the curds can be the most confusing part, but just do not worry. Use a long knife held vertically and cut 1/4″- 1/2″ slices in the curds. Then turn the pot 90° and cut across in 1/4″- 1/2″ slices the other direction, making a kind of checkerboard pattern. Now hold the knife at a sideways 45° angle and retrace your cuts. Turn the pot 1/4 turn and retrace the cuts. Turn it again and cut and then one final turn and cut. By the last turn you probably would not be able to see the original cuts, but just do the best you can.

*Note:  Often times the Mozzarella curds can be a little trickier to cut than other cheeses. It will want to move around in the pot while you try to cut it. You may need to hold it steady with your ladle as you cut it. Just do your best; I know one will know if it is not cut “perfect”.

  • Do not stir yet.
  • Let the curds rest for 10 minutes. The curds are delicate right after you cut them and they need to “harden up” a little bit before you stir them.
  • After 10 minutes stir the curds gently with a slotted ladle.
  • Cut any large curds you missed when cutting the first time.
  • When dealing with Mozzarella, you will find it really wants to “knit” back together, especially if the ripening temperature got a little too high or you let the curds sit too long before stirring them. You may need to cut the curds apart with your knife and or ladle. Cut the curds by using the ladle and the side of the pot or by holding the curds on the ladle and cutting with the knife.
  • Keep the curds at 90° – 91°, covered, for an hour or so, stirring occasionally during the first half hour. I call this “cooking” the curds, even though you really are not cooking them per say.


“Cooking” at a higher temperature will result in a cheese with less moisture or drier cheese that is more rubbery and will yield less cheese per batch (*Note:  The higher the moisture of the cheese , it will yield more cheese out of the same amount of milk). You can experiment with this if you wish but just do not raise the temperature over 100° and raise the temperature slowly (not more than 2° every 5 minutes). Since this recipe works well for me so I do not experiment with it and just stick with holding the curds at 90° – 91°.

  • Stir once every 10 minutes of the first half hour of “cooking” for a total of three stirring sessions. After that, just let curd settle on the bottom of the pot where it will start to mat together.
  • Place a large colander lined with cheesecloth over a pot to catch the whey and pour the curds into the colander. If the cheese has become one lump, just reach in the pot and pull out the cheese and place it into the cheesecloth.
  • Tie up the ends of the cheesecloth and hang the curds to drain for 3 to 4 hours.
  • When the curd has drained for about 4 hours, remove it from the cheesecloth and “work” the curd OR, if you want to wait until the next day then place it in a gallon ziplock bag and place the bag in the fridge and “work” it the next day.


Working the Curd:

You can test the curd to see if it is ready to be worked. Cut off a small piece and put it in some hot water (170° ). Keep feeling it and see if it begins to melt. Once it starts to melt, take it out and see if you can stretch it. If it stretches with no problem, you can go to the next step. If it breaks when you try to pull it, you have not developed enough acidity and the curd needs to “age” in the fridge a bit longer, maybe even until the next day.


When the curd is ready to be “worked”, heat a large pot of water to 170° and add 1/2 cup Kosher salt. If you are working the curd the same day you made it then heat up the whey and use the hot whey instead of water; this makes the cheese even tastier and the curds “work” better as well.


Cut the curd ball in half. You are going to work only one half of the cheese at a time.


Cut the curd into approximately 1″ cubes.


Carefully dump the cubed curds into the hot water or whey.


Let the curd cubes heat for a moment and carefully stir with a slotted flat type ladle.


Squeeze the cubes with your fingertips to test. When the cubes feel soft throughout (not solid in the middle) they are ready for the next step.


Since the curds will continue to soften while you are moving them to the bowl, just let the largest ones still be a just little bit “solid” on the inside.


There is a line between not soft enough to “work” well, and too soft and runny, which you will learn with practice. The curds need to be soft enough, or they will not “work” and pull easily but too runny means failure. DO NOT let the curds heat too long, because if they get too hot and runny, there is no going back. Do not allow anything to distract your attention if you are working your curds.


Carefully remove them with the ladle to a large bowl. These curds are hot, so be careful. Take note that as you begin to work the curds, if you are rough with them, the cream will start to separate out


At first the curds may looks runny, do not worry, just keep going. Carefully take the curds in your hands and form them together into one mass. Gently fold one side over on the other to get it all to come together. Do not squeeze the curd or all the cream will come out and the finished cheese will be dry.


Work the curds gently at first, this will help it retain it’s cream. Keep a bowl of very cold water close by to stick your hands in when they get too hot from the curds. This cools them off and makes holding the hot curds easier.


Once you have got the curds come together so that you can pick it up, then just let the curd do the work for awhile:

Hold one side of the curd lump and let the other end begin to stretch under it’s own weight. When it stretches, fold up the bottom to the top and let it stretch again. As it begins to stretch you can start to help it along a little by pulling on it slightly. Keep stretching and folding. As you “work” the curds, they will stretch easier and easier. You will be able to pull the curds longer and longer. It becomes like pulling taffy (Except for the fact your hands are burning from the hot curd).

You will notice the nature of the curds changing. It will start to become shiny, smooth and elastic. When you get to this point,  you will know when you have about 10 to 15 good “pulls”

Place the cheese back in the water to warm them back for a moment.

Remove the cheese from the hot water and plop it into a mold.

Push the curd into the mold to even it up a bit. You do not have to get it perfect because the cheese is still very soft and it will even out as it rests and cools.

Repeat the “working of the curds” with the remaining curd.

Let the cheese cool at room temperature for a few  hours.

Place the cheese into the fridge overnight.

The next day, pop the cheese out of  the  mold and you are ready to make pizza.

Put the cheese in a ziplock bag and store it in the fridge. It is ready to use right away, but is much  better after a few days. Mozzarella  is one of  the  few cheeses that freezes  fairly well.


Additional Cheese Recipesclick the Link to view the details.


Related topic for you:

Sainte-Maure de touraine 04.jpg
Saint Maure